Print Head Cleaning
03-Mar-2008
8100101600
Solution
Clean the Print Head if lines are missing or if white streaks appear in the printed nozzle check pattern. Cleaning unclogs the nozzles and restores the print head condition. Note that cleaning the Print Head causes used ink to be absorbed in the ink absorber. Cleaning the Print Head consumes ink, so perform Print Head Cleaning only when necessary.
If you click Cleaning on the Pattern Check dialog box that is displayed after printing the nozzle check pattern, go to step 4-(3).
1. Make sure that the printer is on.
2. Open the Paper Output Tray and extend the Output Tray Extension.
Set the Paper Thickness Lever to the left. See [ Paper Thickness Lever ].
3. Open the printer properties dialog box.
4. Start Print Head Cleaning.
(1) Click the Maintenance tab.
(2) Click Cleaning.
Print Head Cleaning starts when the Power lamp starts flashing green.
Do not perform any other operations until Print Head Cleaning finishes. This takes about 60 seconds.
(3) Load a sheet of A4 or Letter-sized plain paper in the Rear Tray.
(4) Confirm the displayed message and click Print Check Pattern.
The nozzle check pattern is printed.
Do not perform any other operations until the nozzle check pattern finishes printing.
REFERENCE
The nozzle check pattern will not be printed correctly if there is not enough ink. Replace the
FINE Cartridge if the remaining amount of ink is insufficient. See [ Replacing FINE Cartridges ].
5. Check the print head condition with the printed nozzle check pattern, and take appropriate action.
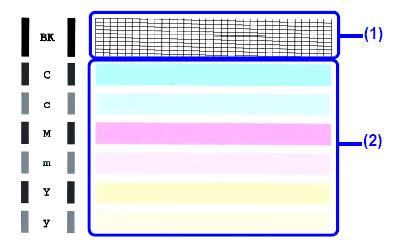
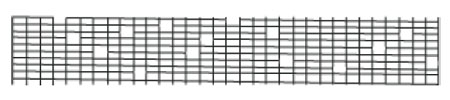
(1) If lines of this pattern are missing, the Black print head nozzle needs cleaning.
Example: When lines are missing (Black ink)

(2) If these patterns have white streaks, the Color print head nozzle needs cleaning.
Example: When white streaks appear (Color ink)

REFERENCE
If the problem is not resolved after performing steps 4 and 5 twice, try Print Head Deep Cleaning. See [ Print Head Deep Cleaning ].
If you click Cleaning on the Pattern Check dialog box that is displayed after printing the nozzle check pattern, go to step 4-(3).
1. Make sure that the printer is on.
2. Open the Paper Output Tray and extend the Output Tray Extension.
Set the Paper Thickness Lever to the left. See [ Paper Thickness Lever ].
3. Open the Canon IJ Printer Utility dialog box.
4. Start Print Head Cleaning.
(1) Make sure that Cleaning is selected in the pop-up menu.
(2) Click Cleaning.
(3) Confirm the displayed message and click OK.
Print Head Cleaning starts when the Power lamp starts flashing green.
Do not perform any other operations until Print Head Cleaning finishes. This takes about 60 seconds.
REFERENCE
Clicking Initial Check Items displays the items to be checked before cleaning.
(4) Load a sheet of A4 or Letter-sized plain paper in the Rear Tray.
(5) Confirm the displayed message and click Print Check Pattern.
The nozzle check pattern is printed.
Do not perform any other operations until the nozzle check pattern finishes printing.
REFERENCE
The nozzle check pattern will not be printed correctly if there is not enough ink. Replace the FINE Cartridge if the remaining amount of ink is insufficient. See [ Replacing FINE Cartridges ].
5. Check the print head condition with the printed nozzle check pattern, and take appropriate action.

(1) If lines of this pattern are missing, the Black print head nozzle needs cleaning.
Example: When lines are missing (Black ink)
(2) If these patterns have white streaks, the Color print head nozzle needs cleaning.
Example: When white streaks appear (Color ink)

REFERENCE
If the problem is not resolved after performing steps 4 and 5 twice, try Print Head Deep Cleaning. See [ Print Head Deep Cleaning ].