Printing Photos Saved on the Memory Card / USB Flash Drive
07-Dec-2010
8201010800
Solution
Preview each photo from the memory card or USB flash drive on the LCD, to select and print the desired photo.
This section describes the procedure to print borderless photos on 4" x 6" / 10 x 15 cm photo paper.
You need to prepare:
A memory card*1 with saved photos. See [ Before Inserting the Memory Card ]
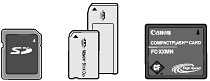
A USB flash drive*1 with saved photos. See [ Inserting the USB Flash Drive ]

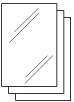
Photo paper for printing. See [ Media Types You Can Use ]
*1 The machine can read up to 2000 photos.
1. Prepare for printing.
(1) Make sure that the power is turned on.
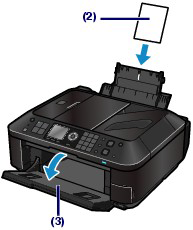
(2) Load paper.
See [ Loading Paper ]
Here we load 4" x 6" / 10 x 15 cm photo paper in the Rear Tray.
(3) Open the Paper Output Tray gently.
2. Insert a memory card or USB flash drive.
Memory card:
Insert it WITH THE LABELED SIDE FACING TO THE LEFT into the Card Slot.
For the types of memory card compatible with the machine and locations to insert them, see [ Before Inserting the Memory Card ]
USB flash drive:
Insert it into the Direct Print Port.
See [ Inserting the USB Flash Drive ]
If the memory card or USB flash drive is inserted when the copy standby screen or fax standby screen is displayed, the photo selection screen in Select photo print will appear.
- If the photo selection screen does not appear
Press the CARD button.
- If the message appears
If photos and documents (PDF files) are saved on the memory card or USB flash drive, the message "Photos and documents (PDF) are saved. Which do you want to print?" will appear.
Select Print photos to print photos, and press the OK button. The photo selection screen in Select photo print will appear.
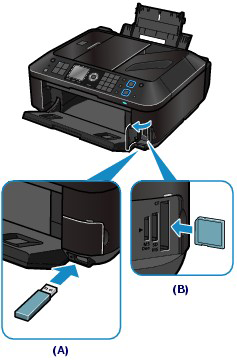
(A) USB flash drive
(B) Memory card
REFERENCE
- If the document selection screen in Select doc. print appears, there are no photos on the memory card or USB flash drive.
- Do not insert memory card and USB flash drive at the same time. Also do not insert two or more memory cards at the same time.
- When [ Read/write attribute ] is set to [ Writable from USB PC ] or [ Writable from LAN PC ], you cannot print image data from the memory card using the Operation Panel on the machine. To print image data from the memory card, press the [ Setup ] button to select [ Device settings ], [ Device user settings ], and set [ Read/write attribute ] to [ Not writable from PC ].
* You can print image data from the USB flash drive regardless of the setting in [ Read/write attribute ].
3. Select photos to print.
(1) Use the  or
or  button (Scroll Wheel) (C) to display a desired photo.
or button (Scroll Wheel) (C) to display a desired photo.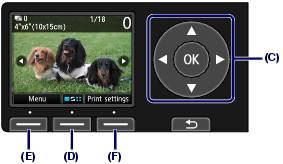
REFERENCE
-
 may appear on the LCD while reading photos. If you use the , or button (Scroll Wheel) to display the photo while appears on the LCD, the desired photo may not be selected.
 - If you press the center Function button (D), the Change view/mode screen will appear. This screen lets you change how photos are displayed. It also lets you select Trimming mode for cropping photos.
(2) Use the Numeric buttons to specify the number of copies.
REFERENCE
If you press the Color button without specifying the number of copies, one copy of the selected photo will be printed.
(3) Repeat the procedures of (1) and (2) to specify the number of copies for each photo.
REFERENCE
- If you press the left [ Function ] button (E) to select [ Menu ], you can select various photo print functions other than [ Select photo print ].
- If you select a photo for which the number of copies is not specified (copies "0") and press the OK button, "1" is set for the number of copies and the screen to change the number of copies will appear.

Use the Numeric buttons or the Scroll Wheel to specify the number of copies, and press the OK button to return to the screen in (1).
4. Start printing.
(1) Press the right Function button (F) to select [ Print settings ], and confirm the page size, media type, print quality, etc.
Here we confirm that 4"x6" (10x15cm) is selected for Page size and the type of loaded photo paper for Type.
To change the settings, use the  or
or  button (Scroll Wheel) to select the item to change, and use the or button to select an option. After confirming or changing the settings, press the OK button to return to the photo selection screen.
or button (Scroll Wheel) to select the item to change, and use the or button to select an option. After confirming or changing the settings, press the OK button to return to the photo selection screen.REFERENCE
- You can specify [ Photo fix ] or [ Print date ] on the [ Print settings ] screen.
(2) Confirm the number of sheets to be used for printing the selected photos.

(3) Press the Color button.
The machine starts printing photos.
REFERENCE
- When you press the right Function button to select Print more while printing, the screen will return to the photo selection screen.
- Press the Stop button to cancel printing.
- Printing does not start if you press the Black button.
- To remove the USB flash drive, see [ Inserting the USB Flash Drive ]