The printer cannot be detected (the message that the printer could not be detected on the network is displayed)
21-Dec-2015
8201015900
Solution
During the wireless setup in the software installation, when the Check Printer Settings dialog box is displayed, try the solutions 1 to 4 one by one in order.
1-1. First make sure all devices, namely, i) printer, ii) access point or iii) router is powered ON. Then, turn OFF every device and turn them ON again.
1-2. Set the printer near the access point or the router to perform the setup.
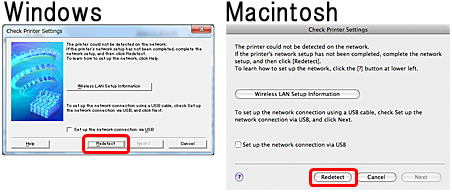
After doing step 1 and 2, click [ Redetect ] to continue the setup.
If you still have the problem, try the next solution menu [ 2. Confirm the connection between the printer and the access point or between the printer and the router ]
2. Confirm the connection between the printer and the access point or between the printer and the router
2-1. Confirm that the WiFi lamp is ON.
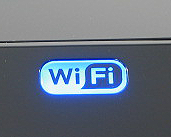
If the WiFi lamp is not ON, the wireless function of the printer is not enabled yet.
Please do the wireless setting again.
For the procedures, refer to [ How to use the printer in wireless connection ] .
When the WiFi lamp is ON, go to 2-2 and 2-3.
2-2. From the operation panel of the printer, confirm the connection by following the steps below.
Step 1.
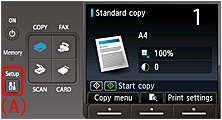
Push the setup button on the operation panel, shown above as (A).
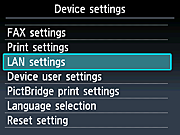
Step 2.

Use the  or
or  button to select "Device settings" then push the OK button.
or button to select "Device settings" then push the OK button.Step 3.
Use the  or
or  button to select "LAN settings" then push the OK button.
or button to select "LAN settings" then push the OK button.Step 4.
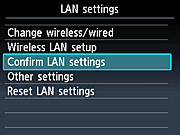
Use the or button to select "Confirm LAN settings" then push the OK button.
or button to select "Confirm LAN settings" then push the OK button.Step 5.
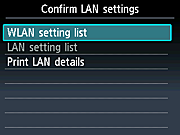
Use the or button to select "WLAN setting list" then push the OK button.
or button to select "WLAN setting list" then push the OK button.step 6.

When "WLAN setting list" is displayed, confirm that "Active" is displayed in "Connection".
If "Active" is not displayed in "Connection" ("Inactive" is displayed), the printer is not connected with the access point or the router. Please do the wireless setting again.
For the procedures, refer to [ How to use the printer in wireless connection ]
2-3. Enter the network key again.
We are afraid but you might enter an incorrect network key.
Please enter the correct network key from the operation panel.
If you still have the problem, try the next solution menu [ 3. Review the setting of the "Firewall" security software ]
3-1. The "Firewall" software interferes with the necessary network communication.
[How to confirm]
The operation of the "Firewall" security software may interfere with the communication for the wireless setup.
Perform the software installation with the "Firewall" security software paused.
After the installation is completed, activate the "Firewall" security software again. When the message alerting that Canon software is about to access the network is displayed on the computer screen, click "Allow" .
CAUTION
- Regarding how to stop the operation of the "Firewall" security software, refer to the instruction manual for the security software, or contact its manufacturer.
IMPORTANT
- Before disabling the "Firewall" operation of the security software, disconnect from the Internet.
If you still have the problem, try the next solution menu "4. Review the setting of the access point or the router."
4-1. As the following setting interferes with the communication for the wireless setup, change the setting. After the setting is changed, perform the installation.
CAUTION
- Regarding how to change the settings of the access point, and the cautions along with its change, refer to the instruction manual for the access point, or contact its manufacturer.
- MAC address filtering function is enabled:
Change the setting of the access point so that the MAC address of the printer can be permitted.
- The same SSID is used between the computer and the printer, and the Privacy Separator function is enabled.
Disable the Privacy Separator function.
- The different SSID is used between the computer and the printer, and the Privacy Separator function is enabled.
Use the same SSID for the computer as the one for the printer.
REFERENCE
- How to confirm the MAC address of the printer
Step 1.
Push the setup button on the operation panel, shown above as (A).
Step 2.
Use the or button to select "Device settings" then push the OK button.
or button to select "Device settings" then push the OK button.Step 3.
Use the or button to select "LAN settings" then push the OK button.
or button to select "LAN settings" then push the OK button.Step 4.
Use the or button to select "Confirm LAN settings" then push the OK button.
or button to select "Confirm LAN settings" then push the OK button.Step 5.
Use the or button to select "WLAN setting list" then push the OK button.
or button to select "WLAN setting list" then push the OK button.Step 6.
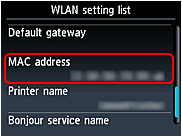
When "WLAN setting list" is displayed, confirm the MAC address using the or button.
or button.