Wireless LAN connection of your printer to an access point using WCN
10-Jul-2013
8201884900
Solution
Before Starting Wireless Connection Setup
REFERENCE
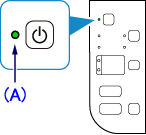
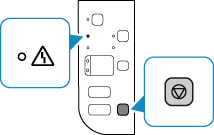
Make sure that the printer is turned on.
If the power is on, the (green) POWER lamp (A) will be lit.
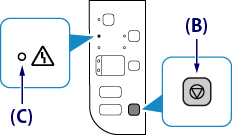
1. Hold down the Stop button (B) on the printer until the (orange) Alarm lamp (C) flashes 15 times, then release the Stop button after the fifteenth flash.
The wireless connection setting information including the PIN code will be printed.
2.
- Windows 7
(1) From the [ Start ] menu of the computer, select [ Computer ].
(2) Select [ Network ].
- Windows 8
(1) Right click on the [ Start ] screen of the computer.
(2) Click [ All apps ] in the App bar.
(3) Select [ Computer ].
(4) Select [ Network ].
- Windows Vista
(1) From the [ Start ] menu of the computer, select [ Network ].
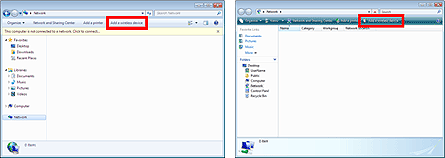
3. Select [ Add a wireless device ] on the menu or [ Add devices and printers ] on the Network menu.
4. Hold down the Stop button on the printer until the (orange) Alarm lamp flashes 16 times, then release the Stop button after the sixteenth flash.
5. Follow the on-screen instructions on the computer to proceed with setup, then enter the WPS PIN CODE described on the printed Network Configuration Page.
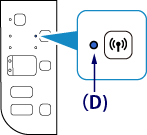
6. When wireless connection is complete, the (blue) Wi-Fi lamp (D) on the printer lights up.